Categories
MetaBlogging

Seven Ways to Master FeedBurner

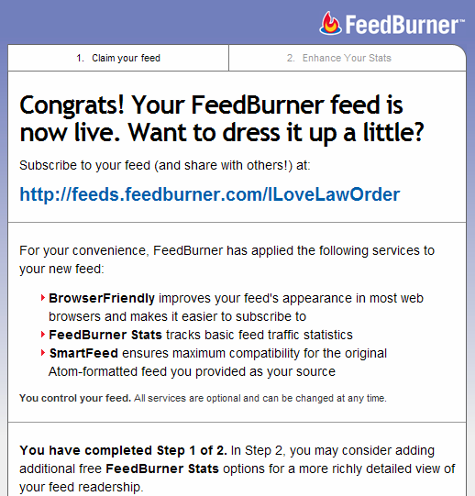
Last week, I offered some basics of FeedBurner. This week, I have seven ways to master FeedBurner. You probably won’t need or even want all of them (I don’t), but they’re pretty cool and you never know what might come in handy!

1. MyBrand. This service, found under My Account, is absolutely great for anyone who owns his or her own domain. Instead of your feed address being http://feeds.feedburner.com/feedname, your address can be http://feeds.yourblog.net/feedname. Feedburner MyBrand
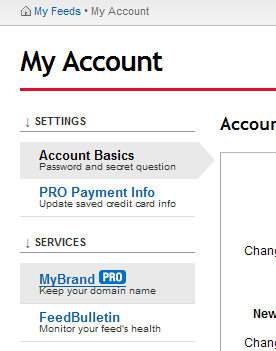
Why is that so cool? It means that, should something terrible happen to FeedBurner, your subscribers are all subscribed to your domain and it will be easy to keep your subscribers and move them. Although BlueHost hasn’t been very helpful (why can’t I just make my own CNAMEs?!), this should be very easy to do, if a bit technical. Danny Sullivan of Search Engine Land wrote a definitive tutorial on MyBrand back when the service charged a nominal fee; today the service is free!

2. Title/Description Burner. Found under the Optimize tab, FeedBurner’s Title/Description Burner let you change the title and description on your feed without altering your site in anyway. If the title of your blog is coming through garbled or would be displayed better in a different format on your feed, use this easy service to make them pop!

3. Feed Image Burner. Speaking of popping, FeedBurner also has a service to insert an image into your feed. Also found under the Optimize tab, the Feed Image Burner is great for adding a logo to your feed stories to distinguish your blog from the dozens of other identical-looking stories passing through your subscribers feed readers every day. It’s also a good way to brand your blog and quickly remind your visitors of what blog they’re reading. I know I’m not always the best about remembering which mommy (or search marketing) blog is which on name alone—but a logo might help!

4. Headline Animator. Another great way to brand your blog, the Headline Animator is found under the Publicize tab. Use the same colors and images that appear in your website and logo to create a custom animator, then include that graphic wherever appropriate. I’ve seen them in email signatures, blog sidebars and, as FeedBurner puts it, “anyplace you can put a snippet of HTML,” all promoting your blog.

5. Email Branding. Under Publicize>Email Subscriptions, Email Branding can help you make the email version of your feed stand out in your subscribers’ inboxes—and make your email subscription look more like your blog itself. Here you can customize the subject MamaBlogga logoline of your feed emails as well as their appearance. As with the Feed Image Burner, you can include a logo to remind readers what blog they’re reading. You can also customize your font (but you’re limited to the five major font families: Arial, Verdana, Trebuchet, Georgia and Times New Roman), size and color of text and links. As with the Headline Animator, using images and colors from your blog can provide a sense of continuity for your readers. My own logo, at right, is a version of my header.

6. Link and/or Photo Splicer. Under the Optimize tab, these two options make it easy for you to include extras in your feed that you might not be able to otherwise: links from various social bookmarking sites (del.icio.us, Digg, etc.) and photo sharing sites (Flickr, Buzznet and Webshots only). No tweaks, no plugins, and you can even set them to update once an hour, once a day or once a week. If you tag your images in Flickr, you can set it to only include pictures with a particular tab, too—keeping the rest of your photos more private.

7. FeedBurner Ad Network. Found under Monetize tab, the FeedBurner Ad Network can help you make money from running ads in your RSS feed. I personally cannot vouch for how hard it is to be invited into the network, since I’ve never tried, nor can I vouch for how much you can make off the ads, but if that’s something you’re interested in doing, FeedBurner already has a way to do it set up.

feedburner edit feed details
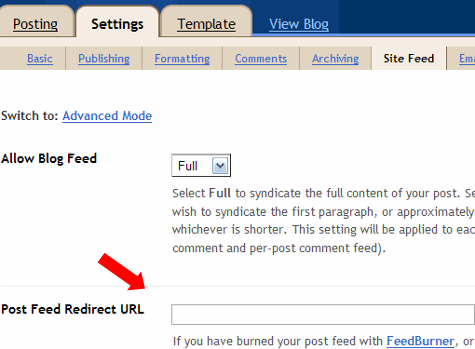
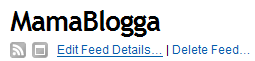
One last capability that isn’t as neat-o as these seven, but is one of the major advantages of FeedBurner is the ability to change your blog address and easily transfer subscribers. Click on Edit Feed Details to find the box where you entered your feed address. Should you move your blog, you can easily update this address to your new one, without sacrificing your subscribers.

Categories
MetaBlogging

5 Steps to Getting Started with FeedBurner

FeedBurner is an excellent blogging add-on service that makes your feeds more accessible to readers and easier to subscribe to. Plus, you can move your feed easily when you move to a different blog address without losing any subscribers. And (possibly my favorite part) you can see how many people subscribe to your blog (although the number isn’t exact). Or maybe this is my favorite part: it’s free.

ugly xmlHow many times have you clicked on a subscribe button and gotten something like this at right?

You don’t want to do that to your latest potential subscriber, do you? FeedBurner gives you a pretty subscribe page with tons of options:
pretty feedburner options

And it’s really easy to do. Just go to the FeedBurner homepage:

step 1
and type in your blog’s URL in the box (step 1).

step 2
It finds your feed (if you have more than one, you get to choose which one to use, and in my opinion it doesn’t really make a difference which one you choose) and moves you along the sign up process (step 2).

step 3
I recommend changing the name of your feed from (the second box, next to the red arrow above) to something more descriptive than /feedburner. (And the /caWa, as far as I know, isn’t necessary unless there’s another blog that’s already taken your desired feed name). Enter your information to create your account (steps 3 & 4).

step 4
The default settings already activated are very useful. The second step here, “Enhance Your Stats,” offers you options to gather even more information about your subscribers.

step 5
Additional options include tracking clickthroughs, to see which items your subscribers are clicking on. Generally, I recommend against using this, but the reason may not apply to you: using this service changes the actual link in feed readers (from, say, http://www.mamablogga.com/post-title-here/ to http://feeds.feedburner.com/~r/mamablogga/29057901384769018346/).

If you think people might link to your post using the URL from your feed (which happens a lot in professional blogs and link round ups, but not as much in the personal blogging arena), don’t allow clickthrough tracking. Otherwise, if you’re interested, you may check that box. If you’re podcasting, check the second box. The grey shaded box may function the same way the clickthrough tracking did; I haven’t tried that one myself yet (step 5).

Getting People to Subscribe to Your FeedBurner Feed
Now, even though you’ve “burned” your feed, you’ll need to make some changes on your blog to indicate that your subscribers shouldn’t use your default feed (which still exists on your blog and is the source for your FeedBurner feed).

Blogger
After Google’s recent acquisition of FeedBurner, Blogger has more fully integrated with FeedBurner.
blogger
Go to Settings>Site Feed. In the Post Feed Redirect URL box, type the address of your newly burned FeedBurner feed (http://feeds.feedburner.com/WhateverYouNamedIt). Save your settings.

self-hosted WordPress
Use FeedBurner’s own FeedSmith FeedBurner Replacement Plugin, which directs your subscribers to your FeedBurner Feed automatically (again, you’ll have to enter your FeedBurner address). Once your plugin is installed and activated, you enter the address under the Options>FeedBurner FeedSmith tab.

TypePad
Go to Configure>Feeds. Find the FeedBurner section and click on the button to connect your feed with your FeedBurner feed. You’ll have to enter your FeedBurner login information, then you’ll be given the options to choose which of your FeedBurner feeds you want to associate with your blog. Save the changes (twice).

All platforms
No matter what blogging program you’re using, you’ll want to prominently promote your feed and encourage your readers to subscribe. FeedBurner’s own Chicklet Chooser (found under the Publicize tab) is one way to get subscription graphics in your design. I’ve also downloaded RSS Subscription graphics, opened them in photo editors and tweaked the colors until they matched my blogs.

Don’t forget to link to your FeedBurner address so when your readers click the picture, they’ll be taken to the right place!

Also: it’s always a good idea to offer an email feed for your readers who don’t use RSS or feed readers. FeedBurner offers an email feed option (also under the Publicize tab). I recommend offering a link to subscribe by email right next to the subscribe by RSS button.

FeedFlare?
feedflare 1
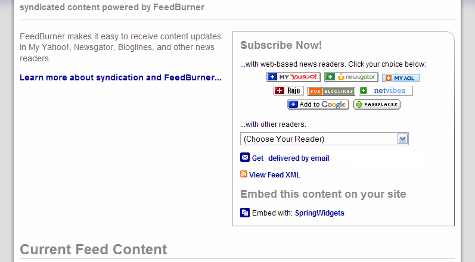
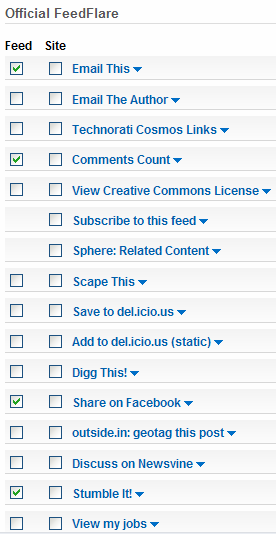
You can customize the way your feeds appear in feed readers with FeedBurner’s FeedFlares, found under the Optimize tag. You can add links to the bottom of your posts to add the story to social sites (like StumbleUpon or Digg), add a copyright notice, add a comment count, and lots more.

Additionally, you can add these to the bottom of posts on your site by checking the box in the ‘site’ column. Your on-site flares and your in-feed flares can be different.

Scroll down to customize the order your FeedFlares appear in by dragging and dropping them within the In Feed and On Site boxes (the first arrow below). Be sure to use the pull-down menu below the On Site box to get the code and instructions for adding the flare to your site (the second arrow below). Don’t forget to activate the service!
feedflare 2

Checking Your FeedBurner Stats
I check my FeedBurner stats at least once a day (I’m a data addict). I actually have a whole bookmarks folder of different stats and site measures that I use the “Open All in Tabs” option with at least once a day. The FeedBurner dashboard is one of those tabs, so I can see at a glance how many subscribers I have that day.

Check back next week to learn how to master FeedBurner!

Categories
MetaBlogging

Take advantage of MamaBlogga

What I’d really like for you to be able to take away from MamaBlogga is a sense of accomplishment and fulfillment in motherhood. But on a more superficial level, I can also help to improve your blogging skills—and give you some links, too.

What does it take to get link love from MamaBlogga? Not a lot, actually—and you don’t even have to e-mail me begging for a link. Once you’ve made 10 (approved) comments on MamaBlogga, the “nofollow” tag is removed from your name (and, I think, any links you put in your comments).

Naturally, we wouldn’t want that to be abused, but I do want you to be able to take full advantage of (“leverage,” if you like buzz words) this.

Make the most of your comments
Once you’ve made your 10 comments, every comment you make on MamaBlogga is a real link back to your post. And as long as you use the same e-mail address, you can change the URL you’re linking to—which is handy if you have a post on the same topic that you’d like to share. Some guidelines for doing this:

  1. Add value to the conversation. No, I’m not asking for you to link only to PhD level posts, but if this is an opportunity to get visitors to your site, do pick a good post that’s on the same or similar topic as the post you’re commenting on. And say something in your comment other than just dropping a link.
  2. Brand yourself. Put the name of your blog in the “name” box. You can put it along with your real name (I usually comment as “Jordan (MamaBlogga)”) if you want. This builds up recognition for your site.
  3. Please don’t stuff the “name” box with keywords. Thanks.

Make the most of other opportunities
Of course, the easier way to get a link from MamaBlogga would be to enter the Group Writing Project next week!

To take full advantage of the Group Writing Project:

  1. Think about your post title carefully. Is there a term you’d like to rank better in search engines for? Does it work in the title and text of your post? Use it!
  2. Republish the final list—you have my permission. This helps to spread the link love to all the participants. The more people that republish the list, the more links we all get!
  3. Barring that, link to your favorite entries. Again, spreading the link love often comes back to help you.
  4. Pass the word along. During the project, tell your blogging friends about it. Ask them to participate (or at least mention it on their blogs), and maybe republished the final list. (Plus, especially for July’s topic, I’d love to see lots of responses to this universal theme!)
  5. Comment like crazy. I’m still impressed by Karen of PediaScribe, who created a Google Alert about the MamaBlogga Group Writing Project and commented on many of the entries before I could! Comments can get people checking out your blog and eventually maybe even linking to you (as I mentioned earlier this week).

Hope to see your entries next week!

Categories
MetaBlogging

Five Ways to Win Links—and Technorati’s Heart

About Technorati
Technorati is a blog search engine. It tracks tags and categories on blog posts, links to a blog, and your “Technorati authority.” You can use Technorati to find posts on relevant topics, track how many blogs are linking to you, or give yourself a little self esteem boost (if your ranking is high). For now at least, Technorati’s tag index pages are also appearing in Google results, so it really pays to have your posts on those pages!

Michelle at Scribbit has some great information on Technorati (Ten Technorati Tips and the Biggest Technorati Tip in the World), but with Technorati’s total redesign a couple months ago, a few things have changed. Michelle’s excellent tips on how to join Technorati, how to add tags to your post and why Technorati matters are still completely accurate. However, Technorati has changed the way they display their information, trying to encompass more than just blogs.

technorati authority and ranking
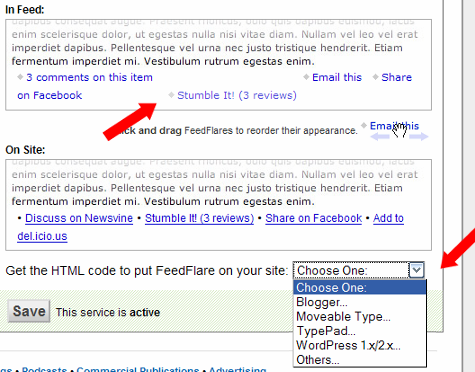
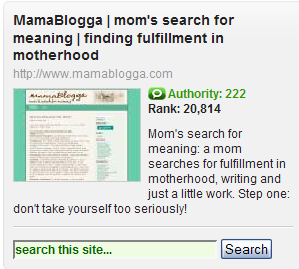
One of the changes is that they no longer list the number of blogs linking in, number of links and authority numbers separately. Your Technorati Authority is the number of different blogs that link back to yours. Your Technorati Rank is based on your authority. UPDATE (Oct 2009): Technorati now uses a scale of 1-1000 to indicate authority, rather than a direct number of blogs linking in.

Most of the growth in these areas comes naturally, albeit slowly. There are a few things you can do to improve your Technorati authority yourself (without opening up fiftybillion mini blogs to link to your real one). Now for . . .

Five Ways to Create Links & Win Technorati’s Heart
Making your own links is almost better than having other people link to you. If you have the opportunity to submit your link (like you do with the last three, and may with the others as well), you can write the text for your link. Whatever the title of your post is, your link on someone else’s blog will say that. Having a good link text can help your page rank for those words in search engines!

So, how do you make your own links on other peoples’ blogs?

  1. Commenting. This one can pay off in a number of ways:
    • Become a regular commenter who adds value to blogs in your niche.
    • Even if your link won’t count for search engines because of a “nofollow” tag, if you have a post on your blog that’s relevant to the topic of that post, share your link. Of course, don’t just drop it in a comment and leave; read the article, comment on its contents and explain how your post was related. The author of the blog might link to you or other readers of the blog might visit you and later link to you.
    • If you comment on a “Dofollow” blog (one that hasn’t linked to you in the last six months), it should count as a point on your Technorati Authority automatically. Always add value to the conversation when you comment!
  2. Create a network of blogging friends. Reach out to people who blog in your niche (hi, blogging friends!) and build relationships with them. Sometimes, they’ll start reading your blog on their own (and linking to it on their own), and sometimes, you’ll be able to ask them to link to a post that’s very entertaining or linkable, or one that you know they’d like.
  3. Participate in blog carnivals. One of my favorites is the Carnival of Family Life, created by Kailani.
  4. Participate in contests including things like Scribbit’s Write-Away Contest.
  5. Participate in projects that will give you links, such as my Group Writing Project.

Speaking of my Group Writing Project—next week is the July Group Writing Project. Spread the word—this is one we’ll all benefit from!


Get more tips of all kinds from this week’s Works-for-Me-Wednesday!

Categories
MetaBlogging

Safely Move Your Blog (eMoms Group Research Project)

Table of contents for Migrating your blog

I made the switch to my own domain just over 3 months ago. I’ve loved it! But moving your blog, especially if your blog is well established, can be a scary thing.

Why? Because it can break every link that your site has already earned. Those backlinks bring visitors to your site and may help your search engine rankings. And if you break them, all is lost.

However, all need not be lost. There is a safe way to move your blog or your website that (most) search engines recognize quickly.

If you’re moving from Blogger/Blogspot to self-hosted WordPress, I recommend my Ultimate Guide to Migrating from Blogger to WordPress, which includes two vital steps to preserving your backlinks. These steps are:

  1. properly implemented redirects
  2. maintaining your permalink structure

Of course, if you do #1 right, #2 may be moot. With proper redirects you can change your entire permalink structure without breaking backlinks and losing search engine love.

But first, we need to:

Evaluate Why You Want to Change
Why do you want to change your URL/domain/blog home? Some good reasons for changing your URL:

  • You don’t own your previous URL.
  • You can’t control your previous URL.
  • Your site/business has evolved into something completely different, and your domain name is completely irrelevant.
  • Your site is expanding and the blog will no longer be at its core. Perhaps moving the blog to a subdirectory is smart—but be sure to use conditional rewrite rules, or people trying to visit the new pages of your site might be redirected to nowhere.

Not as good reasons for moving your blog:

  • Your latest domain name is cooler—will you change every time you snap up a cool new domain?
  • You don’t like having the blog on the front page, but it will still be a very prominent part of your site-If you’re publishing with WordPress, you can set a static page as the “home page” and not have to move anything. This option is found under Options>Reading>Front page. Select “A static page.” The pages system in WordPress is also a fairly good content management system (CMS).
  • Your site/business has changed slightly, and the old URL is not quite as spot-on as it used to be, though it’s still pretty relevant—unless you have a far superior domain name that has significant type-in traffic, you’ll probably be better off explaining to your visitors the full scope of what you do. However, this example may be borderline.

Prepare for the Move
One of the best things to do before you move your blog/site is to generate an XML sitemap for your old site. (This assumes, of course, that you’ve already mapped out a lovely, themed site archetecture, if your site isn’t blog-only.) Hold on to that puppy, because it’s pretty important.

If you’re migrating into WordPress (and especially any part of your blog has been hosted on anything other than WordPress), it’s important to set up your permalinks before importing your old posts. I highly recommend using the Custom Permalinks option, and having your %posttitle% your permalinks.

If feasible, you might consider using a Custom Permalink structure similar to your old one. If you’re importing directly from Blogger to WordPress, for example, you might consider the permalink structure /%year%/%monthnum%/%postname%.html to minimize redirect problems. Not absolutely necessary, but nice.

Be sure to line up some highly linkable content for the first few days and weeks after the move.

Finally, test your design and your new site to make sure it’ll be ready when you throw the switch.

Move
Whether you’re just manually copying your files over or using your blog software’s built-in import feature, you gotta get your files there somehow. Unless you’re using domain masking. That’s another story all together.

Redirection
Make sure you have proper redirects in place. If this is a permanent move, use “301 redirects” to indicate to search engines that this is permanent. Visitors and search engines will automatically be transferred to the appropriate page on your new site if you use these rewrites.

There are various ways of handling this. You can login to your domain registrar and 301 the entire domain over. You can login to your old website and modify the individual pages to include 301 notices in their code. Or you can login to the back end of your website, using Apache or Windows Servers to redirect the old URLs.

The first options here only change the domain name in the URL. If you also changed your permalink structure, be sure to implement redirects for that, too. (It’s probably best to avoid chained redirects, i.e. a visitor going to oldblog.info/superpost.html being sent to yourblog.net/superpost.html being sent to yourblog.net/duperpost.html being sent to yourblog.net/duperpost/. You can handle most of these changes in 1-2 rules rewrite rules.)

For the actual implementation of 301 redirects, I must defer to those who are much more informative than am I:

The Aftermath
Now you’ve done it. You’ve flipped the switch and your new site is live. Be sure to go back through your old site’s URLs (a sample of them, at least) to double check that redirects are going to the right place.

If they’re good, submit that old site sitemap to Yahoo and Google. This will tell them to visit your old links, whereupon they’ll learn they’re redirected to your new links. (Once they’ve come through and learned that, go ahead and replace it with your new site’s sitemap.)

Unfortunately, Technorati will be a casualty in the move. At present, they have no way to edit your blog’s URL, so your new URL shows up as a completely separate blog. (If this changes, I’ll let you know.) If your redirects are written correctly, your posts on your new blog will show up as coming from both your new blog and your old blog. Plus, any internal links within your posts will come up as incoming links to your new blog from your old blog. Confusing enough?

Do what you can to recoup your Technorati authority: e-mail people that you have connections with, asking them to update their links. Also go through Technorati’s steps to delete your old blog. Really, it’s just clutter at this point. Finally, post that really killer, linkable content to earn more links—important for search engine rankings and Technorati authority.

Bear in mind that it will take time for the correct URLs to update in search engine results, but the URLs will change. It took me about 2 weeks before my new URLs started showing up in results. I’ve also seen a page that I redirected a few weeks ago still not change its URL in the results. Aaron Wall’s article this week says he noticed Google & Yahoo change pretty quickly, but MSN/Windows Live not so much.

Don’t forget to update your other blogging add-ons: Google Analytics, FeedBurner, MyBlogLog, BlogCatalog, and anywhere you may have entered your old blog as your website or homepage.

One final concern that you might have: this “sandbox” (if you don’t know what I’m talking about, don’t worry about it). I didn’t experience it for my new site. It’s only 3 months old and I’m in the top 10 for some interesting (and some useful) terms: migrate from Blogger to WordPress, blog stickiness, mom blog advice, etc.

This doesn’t mean that your toolbar PageRank will transfer immediately; this is only updated every few months. Patience. Unless you’re using ReviewMe or Text Link Ads, it doesn’t mean much anyway.

Personally, I think that using the 301 redirects to transfer the trust you built up on your old domain to the new one is the best way to avoid the “new site” penalty. Of course, I didn’t have a ton of trust on my old site, but I did have several months’ of content. (Also, my domain wasn’t brand-new; it was “gently aged.”)

Good luck!


Part of the eMoms at Home Second Group Research Project

Categories
MetaBlogging

Quick Guide to Google Analytics for Bloggers

If you’re serious about blogging, it’s important to focus on your visitors. How much do you really know about your visitors? Do you know where they come from? Why they came to your site? How long they stayed? How many pages they looked at? How many came and immediately left?

Before you say, “Oh, numbers; I can’t deal with numbers!” or “Oh, coding; I can’t deal with coding!”, let me tell you that these numbers are good to know—and very useful in growing your blog readership. And let me tell you that these numbers are easy to find, use and understand with a free web analytics package (software installed on your site that tracks what visitors do on your site)—no coding, just cut and paste.

getting started with google analyticsThere are many free web analytics packages out there. In my opinion, Google Analytics offers the most comprehensive solution. It may be a little overwhelming for someone just starting out, but it’s really not hard to find the most important numbers you need to be keeping track of. Click on the picture at right to enlarge it to see a sample of some of the important, but easy to read, reports that Google Analytics generates.

Setting Up Google Analytics
Google Analytics is easy to set up. If you’re signed up with GMail, Google Talk or Blogger (or any other Google application), you already have a Google account. (If you don’t, you can sign up for one pretty quickly.) To sign up for Google Analytics, you’ll have to enter your information (URL, location, your name, etc.) and agree to the user agreement.

Once you enter this information, Google Analytics gives you some crazy-looking tracking code that you must put on your website. It should look something like this:

<script type=”text/javascript”>
var gaJsHost = ((“https:” == document.location.protocol) ? “https://ssl.” : “http://www.”);
document.write(unescape(“%3Cscript src='” + gaJsHost + “google-analytics.com/ga.js’ type=’text/javascript’%3E%3C/script%3E”));
</script>
<script type=”text/javascript”>
var pageTracker = _gat._getTracker(“UA-xxxxxx-x“);
pageTracker._initData();
pageTracker._trackPageview();
</script>

(Note the new tracking code!)

This should go in your template somewhere in the footer. If you’re on Blogger, you can go to Layout, and click on “Add a Page Element” at the bottom of the sample page. Select HTML/JavaScript. Make sure you are not in “Rich Text” mode, then paste your tracking code here. No need for a title, just save it to your blog. Go back to Google Analytics and verify that it’s running by clicking the “Check Status” button.

Customizing the Dashboard
Once you’re collecting data from your site, Google Analytics can be even more useful to you if you customize the “dashboard” to include the most important reports to you. The dashboard is the first screen you see when you login, and you can choose which reports are displayed there so you see them first thing.

In the above screen shot (actual numbers obscured), you can see that I have the basic reports (this is all below the visitor graph displayed at the top of the dashboard), and have added a keywords report so I can see what words people are using on search engines to find my site and the Top Content by Title report so I can see at a glance which pages on my site are getting the most visitors. I recommend these two reports, since they’re easy to use and understand (not to mention their usefulness!).

The Keywords report is under Traffic Sources>Keywords. To add it to the dashboard, click the “Add to Dashboard” button under the large title “Keywords” near the top of the page. The Top Content by Title report is available under Content>Content by Title. You can add it to the dashboard in the same way. You can delete and drag-and-drop the boxes in the lower part of the dashboard to how you like it.

Also useful (but already included on the dashboard): Average time on site (are people popping in quickly or sticking around at least long enough to read something?), pages per visit (do people look at more than one page while at your site?), bounce rate (how many people leave your site after viewing only one page?) and the traffic sources pie graph. I also like to look at my top referrers (under Traffic Sources>Referring Sites) to know where my visitors are coming from.

Using the Information
Well, now what? You can see the words that people use in search engines to find your site; you can see how long they spend there; you can see how many pages they view. What can you do with this information?

First of all, you can see what pages of your site are most popular. From this, you may be able to tell what topics and style your readers like best—of, if you did something special to promote your most popular posts, you can see what you need to do again.

Secondly, you can see how many of your visitors turn around and leave. In and of itself, bounce rate isn’t necessarily bad. Unlike many websites, it’s entirely possible for visitors to your blog to visit your site and read everything new in a single visit, then navigate away (possibly to subscribe to your feed).

If your popular posts have a higher than average bounce rate, what can you do to improve that? Make sure that your most popular posts also highlight similar posts on your site. For more information on lowering your bounce rate and increasing your blog’s stickiness, download the free guide Get Your Visitors to Stick!

Another important use of your analytics is to see what sites and keywords people are using to find your site. You may never know what people are searching for when they find your site. However, if you see large trends that are central to the theme of your blog (like many people coming to your photography site for some variation of “baby portrait”), you could try to “target” this keyword more by:

  • Making it a label, tag or category on your blog
  • Making it part of the navigation, like your About or Contact page
  • Including it in the Title or Description of your blog
  • Writing a post that sums up (and links to) all your tips (if you do this, be sure to go back through the old posts and link to the new one, as well).

Finally, try not to worry too much about your blog stats. It’s so easy to become obsessed with your blog’s stats, and to tie your blog’s worth or even your own self-worth to the number of page views you generated yesterday. It’s not worth that much—really.

Download this Quick Guide to Google Analytics for Bloggers, complete with helpful pictures, as a free PDF!